HIFI Diary: How to Choose the Right Desktop Speakers for Your Setup
Hi-Fi: From Beginner to Cremation Series
[Expand / Collapse]
-
Hi-Fi Beginner’s Q&A
Quick answers to common questions for beginners
-
How to Judge and Describe Sound Quality?
An analysis of key stages affecting sound quality and understanding audio characteristics
-
What is a DAC? What is a Decoder?
In-depth analysis of the differences between DAC chips and dedicated decoders
-
A Brief Introduction to Digital Audio Formats and Technologies
An all-in-one guide to digital audio formats
-
What Are Bluetooth Codecs SBC, aptX, AAC, and LDAC?
A complete breakdown: which Bluetooth codec is the best?
-
From the Basics to Depth: Understanding Frequency Response Curves and Waterfall Plots
A quick guide to reading 2D and 3D spectrograms
-
How to Choose and Buy Hi-Fi Gear? How to Filter Useful Information?
A practical buying guide and pitfalls to avoid when shopping for Hi-Fi gear
-
How to Choose Desktop Speakers?
Buying desktop speakers from scratch
-
Building a DIY Hi-Fi Setup Just Like a DIY Custom PC
Step-by-step workflow for assembling a complete Hi-Fi system
-
Can’t Tell the Difference Between MP3, Lossless, and Hi-Res? Try the Golden Ears Test
The legendary Golden Ears test is here!
-
Amplifier Power Calculation and Technical Demystification
Not sure if your amp has enough driving power? Let this dedicated calculator help you
-
DIY High-Performance Music Server
Hands-on building a PC CORE and exploring its impact on sound quality
-
Selection and Discussion of Ethernet Cables
Exploring the impact of network cables on sound quality
-
Principles and Exploration of Hi-Fi Network Switches
An analysis of the principles behind the trending Hi-Fi network switches
-
The Ultimate Audio Mysticism: Grounding Box Comparative Test
A hands-on comparative review of multiple audio grounding box brands
-
Audio Solder Comparison
Exploring the sonic differences between various solders in DIY audio cables
-
Head-to-Head Comparison: Audio Fuses from $0.30 to $200
Comprehensive comparison across numerous fuse models and amperage ratings
-
AudioQuest Diamond / Wireworld Platinum Starlight 7 / W4S / Xianyu Handmade I2S/HDMI Cable Comparison
Sound comparison of HDMI cables from multiple Hi-Fi brands
-
How USB Cables Affect Sound Quality
USB cable selection and exploration of its impact on sound quality
-
Starting from SATA Data Cables: Discussing the Chaos of DIY Audio Cables
An in-depth look into Hi-Fi SATA cables
Recently, the BLOG owner rearranged his desk and finally resolved to sell the soundbar speaker he had been using for so long. Consequently, what kind of speaker pair to add next became a question that required careful deliberation. This article also packs a wealth of practical insights on speaker placement—unique across the entire web, so don’t miss out! =W=
I. Why Do I Need Desktop Speakers?
First of all, in the BLOG owner’s view, choosing a desktop speaker comes down to several reasons:
1. Limited desk space
2. Budget constraints (generally speaking, desktop speakers are cheaper than floorstanding speakers)
3. Aesthetics (at least for the BLOG owner, compact and mini speakers earn bonus points)
Beyond the reasons above, more professional considerations include:
1. Nearfield monitoring (small-scale music creation, mixing, recording, etc.)
2. Portability (the ability to bring speakers to any workspace at will, pairing with a laptop for a consistent monitoring experience)
Taking all the points above together, if they happen to align with your needs, then an active desktop speaker definitely deserves a spot on your radar. Conversely, if your sole pursuit is ultimate playback sound quality, or if you have ample placement space (such as a living room or a dedicated home theater/listening room), then desktop speakers should not be on your shortlist; choosing passive Hi-Fi speakers would be a far better option.
II. How Are Desktop Speakers Categorized?
Once you decide to choose a desktop speaker, the sheer variety of options laid out before you is overwhelming. Generally, the BLOG owner roughly divides desktop speakers into two categories: “multimedia speakers” and “studio monitors.” As for “Hi-Fi speakers,” the BLOG owner does not believe traditional Hi-Fi speakers belong on a desk, and thus excludes them from consideration. Moreover, whether discussing multimedia speakers or studio monitors, the BLOG owner focuses exclusively on active speakers (meaning speakers with built-in amplification).
1. Multimedia Speakers
As the name implies, multimedia speakers primarily serve multimedia content, such as multi-channel movies, gaming, rich customizable sound effects, Bluetooth, RGB lighting, and more. Their form factors are not limited to standard left and right bookshelf enclosures—for instance, the Xiaomi soundbar the BLOG owner used previously, or the Sony Glass Sound Speaker, or even wireless speakers like the Apple HomePod. The hallmark of these speakers lies in their feature-rich versatility, stylish appearance, and minimal demands on source/front-end gear (transports, DACs, amplifiers, etc.). The advantages are crystal clear: most multimedia speakers are priced under $430 (per pair), with multiple standout star products across every price bracket. They also offer immense advantages in positional audio for gaming and surround effects for movies. Yet alongside these strengths, we must address their shortcomings: the biggest issue with multimedia speakers is often a lack of raw acoustic fidelity. When it comes to music reproduction, manufacturers tend to apply targeted tuning to create an artificial sensation of ‘pleasing’ sound. For example, we often hear claims that a certain speaker is ‘stellar for female vocals’ or that another has ‘explosive bass, unbeatable for electronic music.’ For budget multimedia speakers, these descriptions are actually backhanded compliments; they imply the speaker is only suited for one specific genre, while harboring glaring flaws across other frequency bands.
2. Studio Monitors
Having covered multimedia speakers, we now arrive at today’s star attraction: studio monitors. Studio monitors are speakers designed to observe, monitor, control, and adjust sound—they are far more than just speakers with great sound quality. They serve as audio quality monitoring tools for recording, mixing, broadcasting, and any other high-standard professional application. In recent years, with the boom in live streaming and content creation, studio monitors are also widely used in short-video production, streaming workflows, Vocaloid music production, and other audio-related work. Naturally, the advantages of studio monitors revolve around their professional utility: rich environmental adaptability (adjustable acoustic parameters), solid build quality and stability, and exceptional playback fidelity (sound quality). Their disadvantages are equally evident: as professional workhorses, their entry price is significantly higher than multimedia speakers, typically starting around $140 (per pair), and most standard studio monitors are sold individually to facilitate multi-channel setup flexibility.
With both categories introduced, let us move to the most critical part: how to choose.
III. How to Choose Desktop Speakers
1. Which Category Should I Choose?
Generally speaking, choosing the right desktop speaker boils down to satisfying your primary use case. If your main goal is audiovisual entertainment—especially if you have demanding entertainment needs while having modest expectations for pure music reproduction—then multimedia speakers should be your choice. Here, the BLOG owner recommends sticking with traditional 2.0, 2.1, or 5.1-channel multimedia setups whenever possible. Try to avoid single-unit soundbars or single Bluetooth speakers (or multi-speaker wireless mesh setups); no matter how extravagant the marketing claims are, no amount of “black magic” DSP can truly compensate for fundamental acoustic architectural deficiencies.
If your primary need is music playback, audio production, or other serious acoustic endeavors, active studio monitors (active = powered: speakers with built-in amplifiers) are the superior choice. Ever since the PreSonus Eris E5 burst onto the scene years ago and redefined the entry-level price point for (legitimate) studio monitors, the even cheaper E3.5 has now dropped to around $115 (per pair). In all fairness, at such a low price point, acoustic performance is difficult to guarantee, and the budget segment is rife with mediocre offerings—some even pitching colored tuning as a selling point. Therefore, the BLOG owner suggests that if you wish to invest in studio monitors, you should budget at least $140 (per unit). Otherwise, you might as well opt for feature-rich multimedia speakers—such as Bose multimedia speakers, which offer respectable build quality and sound tuning.
2. What Size (Woofer Diameter) Should I Choose?
Multimedia speakers rarely emphasize driver size, as that is not the focus of such products—aesthetics and physical footprint are what constrain them. In studio monitors, however, size is paramount. Ranging from 3 inches (referring to the main woofer driver size, not cabinet dimensions) all the way up to 8 inches, this span covers the mainstream studio monitor market. So how large of a speaker should you actually choose? In reality, it depends on the size of your room and the direct line-of-sight distance between you and the speakers. Many veteran audiophiles rely purely on empiricism and intuition, drawing a complete blank when asked to explain the underlying acoustic rationale. Below, the BLOG owner outlines a systematic step-by-step process for determining speaker size for your reference:
<1> Step one is to determine the speaker placement. Considering that most buyers of desktop speakers do not have an acoustically treated reference listening room, the BLOG owner offers the following recommendations based on typical domestic environments in accordance with the ITU-R BS.775-2 standard:
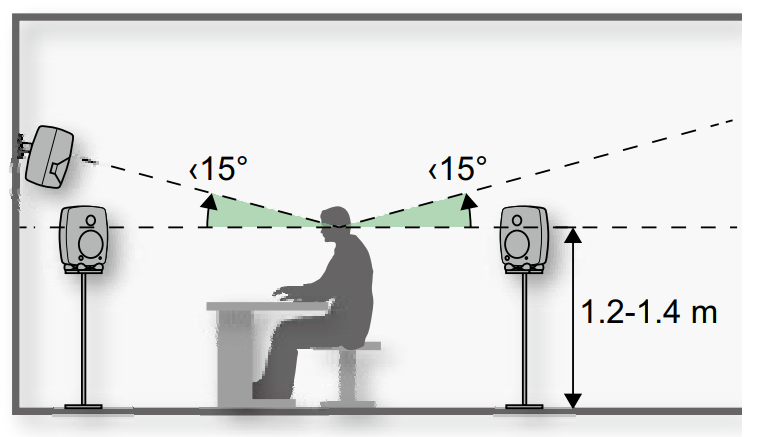
① Speaker Height: According to standards, speakers should not be placed lower than 1.2 meters from the floor, but even when wall-mounted, they should not exceed half the room’s ceiling height (considering typical ceiling heights of 2.5m–3.0m, the optimal height is 1.2m–1.3m). When seated, the speaker’s tweeter should be level with the listener’s ears. While wall-mounting and angling speakers downward trades some vibration isolation to reduce floor reflections, note that the acoustic axis angle relative to the listener’s ears must not exceed 15 degrees.
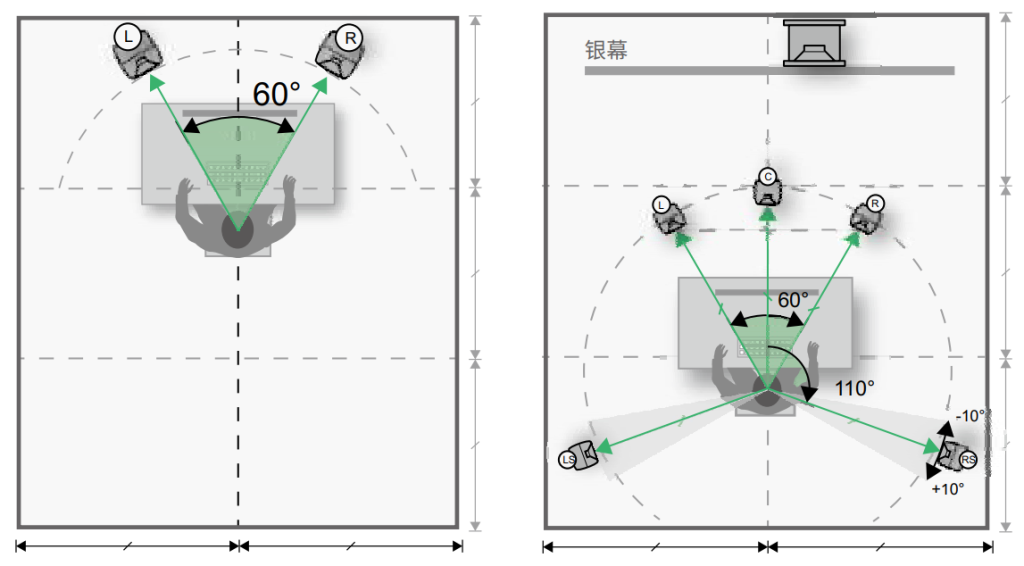
② Placement Angle: One of the most prominent differences between studio monitor setups and traditional Hi-Fi systems lies in the listening triangle angle. Taking a 2.0-channel system as an example (bottom left in the diagram), the listener should first position the two speakers relative to the desk, establishing an equilateral 60-degree angle with the listening position (please adhere strictly to this setup, as it significantly impacts the acoustic axis distance and the resulting SPL measurements). Furthermore, to better mitigate standing waves, the listening position (sweet spot) should be at least 1 meter away from both left and right side walls.
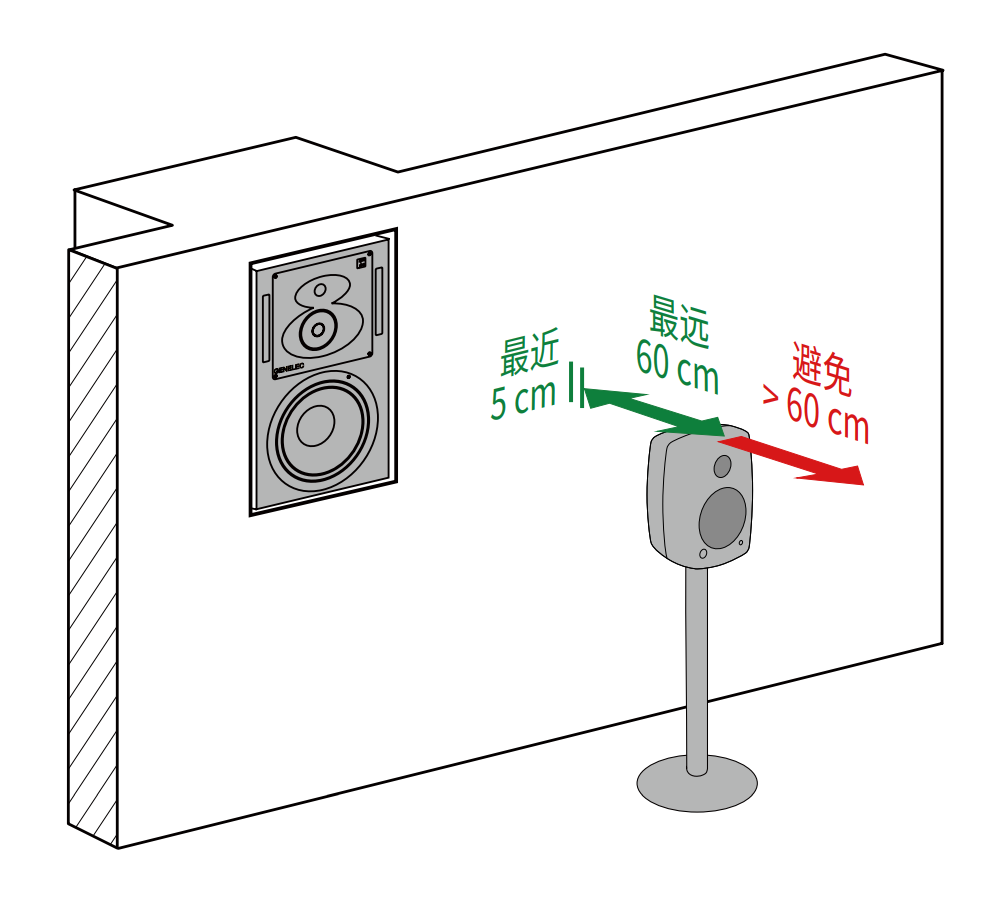
③ Speaker Boundary Placement: Rear-ported speakers (speakers with bass reflex ports on the back) require special attention regarding wall distance to prevent acoustic cancellation caused by boundary reflections (in short, frequencies below 150 Hz may suffer cancellation notches, resulting in bass suck-out). It is vital to understand that rear wall reflections primarily occur at low frequencies, where reflected energy cancels out direct sound and reduces low-frequency extension at specific frequencies. In conclusion, maintain at least a 5 cm gap between the rear port and the wall, while ensuring the front baffle of the speaker is less than 60 cm from the rear wall.
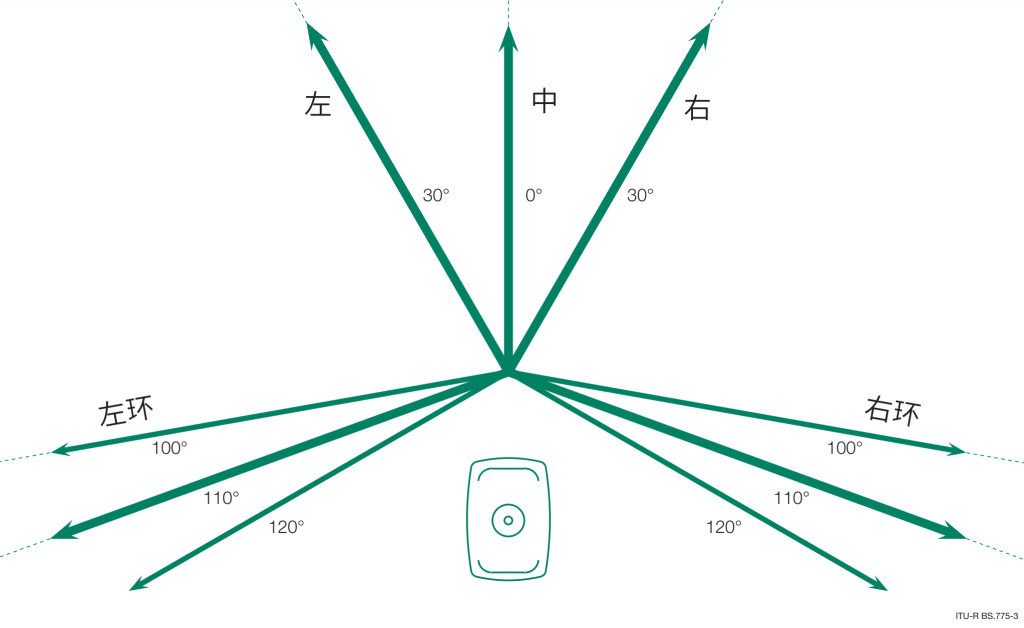
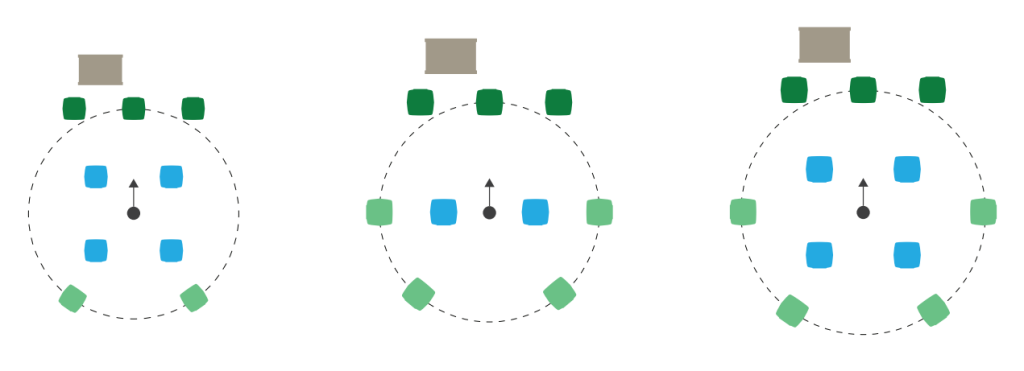
④ Multi-Channel Placement: Because professional studio monitors are sold individually, purchasing multiple units paired with a multi-channel audio interface allows you to build a surround setup. Expanding on this topic in detail would make this article overly bloated, so the BLOG owner simply provides reference illustrations—for instance, multi-channel speaker placement angles can refer to the ITU-R BS.775-3 standard (diagram below).
Building on the diagram above, you can refer to the following layouts to configure various setups (from left to right: 5.1.4, 7.1.2, and 7.1.4 systems). These represent common modern home theater configurations. Note: multi-channel systems—particularly modern DTS and Dolby Atmos standards—incorporate overhead height channels, placing extremely high demands on the acoustic environment that typically require structural planning during room renovation. Therefore, the BLOG owner recommends that 5.1 or 7.1 systems are more than sufficient for home use, drastically lowering space and installation requirements.
<2> After determining speaker placement, the next step is to find the maximum Sound Pressure Level (SPL) at 1 meter in front of the speaker (the average short-term max SPL measured with sine-wave signals within the 100 Hz – 3 kHz range). Legitimate monitor manufacturers clearly specify this in their product manuals; if you cannot find it, the speaker is likely not a standard studio monitor, and you should look elsewhere.
<3> Once the max SPL spec is established, you can calculate the distance attenuation (max SPL drops by 6 dB for every doubling of distance / per meter according to the inverse-square law) to determine the maximum SPL at your listening position. According to ITU-R BS.1116-1 recommendations, the maximum SPL at the listening position should not be lower than 82 dB–85 dB. If setting up a multi-channel multimedia system, calculate the distance from each speaker to the listener to find the cumulative maximum SPL arriving at the sweet spot.
<4> If the calculated max SPL delivered by the speaker falls below 82 dB, you need to upgrade to a speaker with a larger driver size. Furthermore, testing under the IEC 60268-5 standard yields the long-term maximum SPL (also retrievable from spec sheets, though some manufacturers omit it); at the listening position, speakers delivering a long-term max SPL exceeding 100 dB are not recommended. Crucially, when selecting a speaker size, aim for one that lands closest to 82 dB after distance attenuation—do not blindly opt for oversized speakers.
IV. Common Questions and Misconceptions
Through the explanations above, you should now understand how to choose the right speakers for your setup. While the professional realm involves numerous additional factors, they demand stringent room acoustics (acoustic interior treatment) along with substantial experience and financial investment. For now, knowing the principles outlined above is more than sufficient. Even so, you may frequently encounter confusing claims that inadvertently lead your decision astray. In reality, many of these assertions are laughable, if not downright absurd.
1. “Always buy the biggest speakers possible—after all, bigger is always better.”
To some extent, this statement holds truth: larger drivers provide higher SPL output and deeper low-frequency extension. However, their demands on your acoustic environment escalate dramatically. In reality, the acoustic problems introduced by an untreated room far outweigh the benefits gained from oversized drivers. Debating speaker performance in isolation from the actual room environment is meaningless, so please select an appropriately sized speaker strictly according to the guidelines above.
2. “If bass is lacking, just add a subwoofer!”
For most people, low-frequency room resonance and modal ringing have already swallowed up whatever clean bass the main speakers could deliver. Adding a subwoofer will simply subject that extra bass energy to the same untreated room acoustics. In fact, introducing a subwoofer can completely destabilize frequency balance, resulting in muddy sound and jarring discontinuity across frequency bands. Therefore, the BLOG owner advises treating the room acoustics before buying a subwoofer; otherwise, you will only invite more problems.
3. “Can I pair a Brand A subwoofer with Brand B main speakers?”
The answer is an emphatic no. A subwoofer functions by taking over acoustic frequencies below a specific crossover point. Different manufacturers design crossover slopes, phase alignments, and cutoff filters differently. Blindly mixing two disparate brands risks creating frequency response dips or phase cancellations in the handover region, resulting in disjointed bass that cannot easily be remedied by any tuning method.
4. “Domestic Chinese studio monitors are vastly cheaper than foreign brands; are they a better choice?”
Let us examine an interesting comparison. Link 1 leads to the official product page for the X3 monitor by well-known domestic brand HiVi (Swan), while Link 2 is the technical manual for the entry-level monitor from budget-slashing foreign manufacturer PreSonus. Without being unfair, HiVi does not even offer a technical manual download for that model. Furthermore, searching their entire website reveals no mention of Peak SPL (maximum sound pressure level), whereas PreSonus clearly specifies 100 dB. Anyone who read the earlier sections understands how pivotal this parameter is when selecting speakers. Thus, regardless of how lavishly HiVi touts its acoustic laboratories or boasts about how stunning their speakers sound, failing to provide basic engineering transparency exposes everything else as mere layers of marketing hype.
5. “Is acoustic room correction actually useful?”
Acoustic calibration was originally a high-end professional technology that has recently trickled down into entry-level consumer models—popular offerings like the iLoud MTM or the widely discussed Apple HomePod both utilize it. Simply put, this technology uses calibration microphones positioned in the room to measure test sweep signals and applies DSP equalization to correct frequency response. Frankly speaking, room calibration in entry-level products cannot eliminate all acoustic flaws, because acoustic issues extend far beyond simple frequency response anomalies (such as decay times and early reflections). As such, calibration should serve merely as an auxiliary tool; you must still focus on optimizing your physical listening environment.
6. “Do active speakers have high demands on front-end gear (DACs), power supply, and vibration isolation?”
Yes, they do. If you are using speakers priced above $430 (per pair), you should ideally prepare a dedicated DAC. When your investment in speakers surpasses $700 (per pair), you can begin considering cleaner power supplies, quality interconnects, and dedicated isolation pads/feet to fully unlock their potential. However, these upgrades demand substantial experience and budget; jumping in unprepared is ill-advised. The BLOG owner recommends thoroughly reading the other educational guides on this BLOG and preparing a budget that exceeds the cost of the speakers themselves before diving into peripheral upgrades.
7. “Monitors are just work tools; they don’t actually sound enjoyable.”
This sentiment is frequently directed at Genelec, representing one of the most classic and thoughtless cliches in the audio community. A “work tool” speaker is an instrument used by music creators in their professional workflows. Creators need gear that accurately reproduces their artistic intent and conveys the emotions they wish to express; this requires not only precision, but also the capability to reveal authentic musical beauty. No matter how talented a creator is, moving music cannot be composed in the dark. For years, half-informed hobbyists have loved labeling studio monitors (and monitoring headphones) as “dry, cold, and thin”—a bias rooted in outdated misconceptions. If you wish to explore this deeper, the BLOG owner recommends reading this article. If after reading that you still maintain that “everyone has their own taste” and stubbornly believe standard studio monitors sound unpleasant, then frankly, this entire BLOG is not for you—feel free to click the “X” in the top-right corner.
8. “What if I don’t know how to handle acoustic interior treatment?”
You could always ask the BLOG owner for a consultation, lol. After all, the BLOG owner’s side gig is helping people with acoustic home design (as for the main job? You’re welcome to guess). Additionally, a friend of the BLOG owner in Macau is planning to open a new shop soon and is preparing for acoustic treatment. If the BLOG owner ends up overseeing the project, a case study walkthrough may be published for everyone to see! =W=


You May Also Like
HIFI Diary: LHY Audio Raspberry Pi Streaming Media Bridge Review

HIFI Diary: TANCHJIM 4U 4-Level Sound Adjustment In-Ear Sound Quality Review